DeskPins v1.32
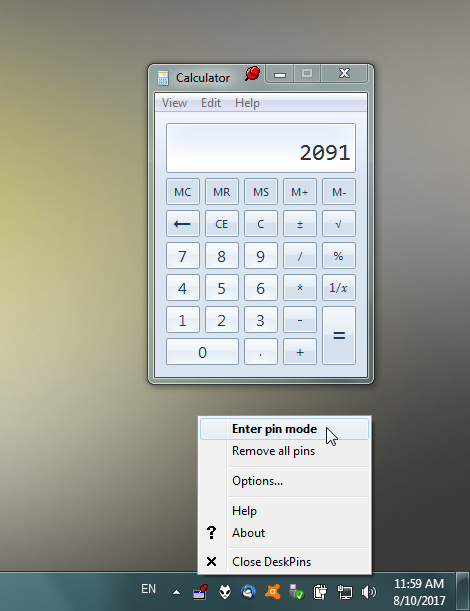
DeskPins - can be used to make any application topmost, that is, to keep it above all other windows. Just grab a pin from the DeskPins icon in the system notification area and click on any window. This functionality is identical to the "Always on Top" setting found in some programs. With DeskPins you can add this feature to any program.
DeskPins is open source.
Features:
• Unlimited number of pins available.
• Intelligent handling of various application types.
• Powerful wildcard-based automatic pin support.
• Global hotkeys.
• Negligible system resources usage.
What's New
v1.32 - 2015.02.20
• Fixed inability to autopin windows of 64-bit processes.
v1.31 - 2014.09.15
• Fixed mouse pin bug on Windows 8.
• Unicode support for modern Windows versions.
• Removed UPX compression, to avoid being flagged by anti-malware.
v1.30 - 2004.05.03
• Autopin feature.
• Better localization support. DeskPins now supports separate language packs, instead of including all languages in the main program file.
• Pins can be of any color.
• Full XP theme support.
• Tab-based Options dialog.
• Fixed a multi-monitor bug reported by Grant Emsley and tested on multi-monitors system.
• Fixed a bug that would crash DeskPins just before exiting on Win9x (options were not written in the registry).
Requirements:
• Windows 8, 7, Vista, XP, 2000, 9x.
• Microsoft Visual C++ 2008 SP1 Redistributable Package (x86). This a common library and will probably be already installed in your system. Check Programs and Features in the Control Panel for a relative entry (any version starting with 9.0.30729).
Homepage: http://users.forthnet.gr/pat/efotinis/programs/deskpins.html
Homepage: https://efotinis.neocities.org/deskpins/index.html
Bitbucket: https://bitbucket.org/efotinis/deskpins / download
Скачать: DeskPins v1.30
Скачать: DeskPins v1.32 / Src / Rus
OnTop v2.2.1
A simple program for WindowsOS that allows you to pin a window on the top of all other windows.
The program allows you to keep a window always on top. It also has options to pin an app (all windows of an app), which remembers the app and automatically pins any windows open from it.
Features:
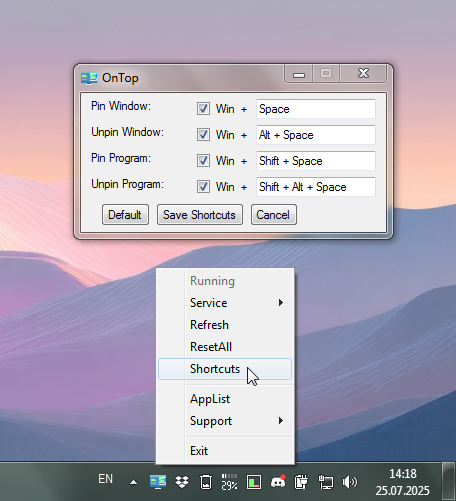
• Pin Window (win+space): Keeps a window on top of all other windows.
• Unpin Window (win+alt+space): Removes the AlwaysOnTop ability of a window.
• Pin Program (win+shift+space): Keeps an app (not just a window) always on top.
• Unpin Program (win+shift+alt+space): Removes the AlwaysOnTop ability of a previously pinned app.
The Pin Window ability is temporary, which means it will remain active only until the window is closed. The Pin Program ability is sticky, which means it will remain in effect until the user manually unpins it.
To change the default shortcut keys, please right-click on the OnTop tray icon and open the Shortcuts menu.
Changes:
v2.2.1
- Improve auto startup
- Show tray menu on left click
- Show current hot keys in the tray tooltip
- Fix program termination for invalid hwnds
- Various other bug fixes and improvements
GitHub: https://github.com/NeonOrbit/OnTop
Скачать: OnTop v2.2.1
PinWin v0.2.2
PinWin - is a minimal Windows system tray application that allows you to pin any windows to the top of the screen with one click.
Features:
• Pin windows from list in system tray
• Directly select window from screen
• Global shortcut for selecting windows
• Runs quietly in background and does not need installation
• Source: https://sourceforge.net/projects/pinwin/
Requirements:
- PinWin requires Windows 7 or newer and .NET Framework 4.6.2 or higher.
GitHub: https://github.com/Bluegrams/PinWin
SourceForge: https://sourceforge.net/projects/pinwin/
Скачать: PinWin v0.2.2
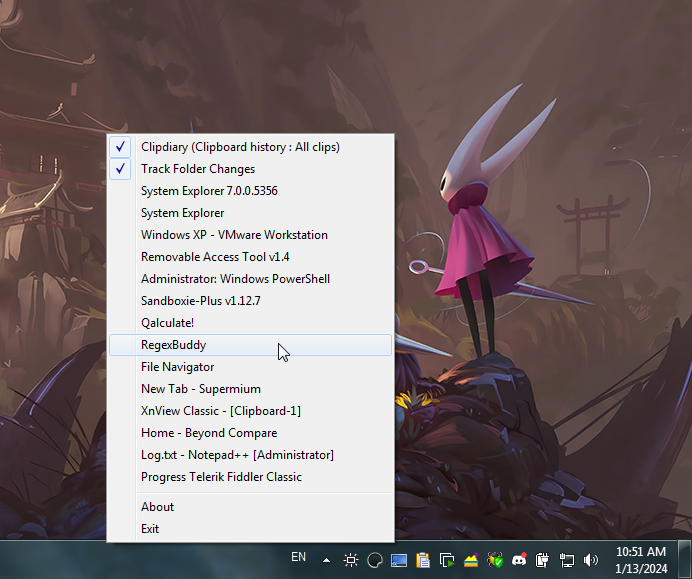
TopMost2 v1.0.0
This tool allows you to make any windows always on top. Using .NET framework.
Double Click
Double Click the tray icon, make the current selected window stay on top.
Global Hotkey
Use the default hotkey Ctrl + Alt + Space to make the current selected window stay on top.
Change The Hotkey
Right click the tray icon and go to options page to change the hotkey to your own favorite combination.
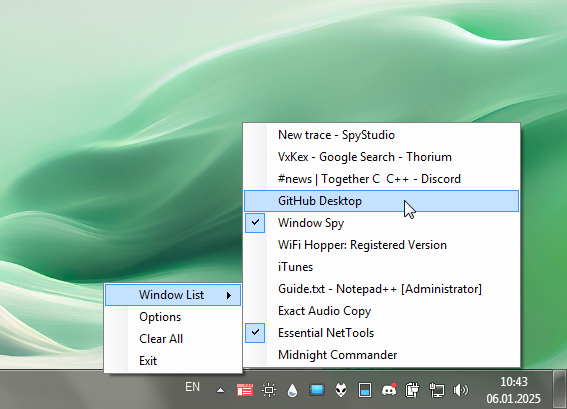
Window List
Click on a menu item from the Window List to pin or unpin any windows.
Other Features:
• Dynamic icon
• Clear all function
• Automatically startup option
• Enable/Disable keyboard shortcut option
• Freely customizable hotkey
• Global hotkey
• Command-line support
• High compatibility with other programs
• Negligible system resources usage
Why do I need this?
Topmost or Always On Top is a property of every window you see on your computer. A window whose Topmost property is set to true appears above all windows whose Topmost properties are set to false.
Many windows applications don’t offer an option to make itself topmost. When you are browsing multiple windows at the same time, this may make you annoyed by frequent switching to different windows. With TopMost2, you can add this feature to any applications and solve the above problem.
Details:
• Tray Icon
The color of the icon represents the top-most state of the current selected window.
🟥RED = Normal, 🟩GREEN = Top-most
• Clear All Function
This function will set all windows to normal states.
• Elevated Privileges
If you are trying to set an elevated window, TopMost2 will ask you to elevate the privileges in order to have higher permission to finish the action. Obviously, the reason is that they are protected by the operating system. You can also start TopMost2 as administrator to avoid the above problem.
• Hotkey
You can freely set any hotkey combinations. By clicking the Edit button, you can then press a new combination. After that, click Done to finish. If you leave or close the option form. The hotkey setting will be auto-saved by the system.
If TopMost2 starts with normal permission, it may not be able to read the input of the keyboard in the elevated window.
• Exit
This function will set all windows to normal state and shut down the program.
GitHub: https://github.com/Jerrylum/topmost2
Скачать: TopMost2 v1.0.0
TranspWnds v1.4.1
This program makes semitransparent windows and other operation....
A small description
- alt+mousewhell makes semitransparent windows
- alt+ctrl+left button down makes windows topmost
- and any operation...
Minimum operating systems Windows XP
Changes:
1.4.1 Released
1) Fixed "divide by 0" ...
2) Added ability to send a message to the author via the standard mail client from the tab System..
3) Fixed bug setting position slider "Step change of transparent level"
Homepage: https://code.google.com/archive/p/transpwnds/
GitHub Fork: https://github.com/namarium/TranspWnds
Скачать: TranspWnds v1.4.1
Stay On Top v1.1
Allows you to force a window to "stay on top" of the other windows. Just right-click on the icon in the system tray and a menu will display listing all open visible windows. Just select the window you want to "stay on top". You can also use this menu to tell windows to STOP staying on top.
Homepage: http://geocities.com/e_ri_c_v/cheesy_yahoo_page.html
Download: http://www.geocities.com/e_ri_c_v/StayOnTopSetup.zip
Download: http://download.cnet.com/Stay-On-Top/3000-2072_4-10430147.html
Скачать: Stay On Top v1.1
Window TopMost Control v1.3
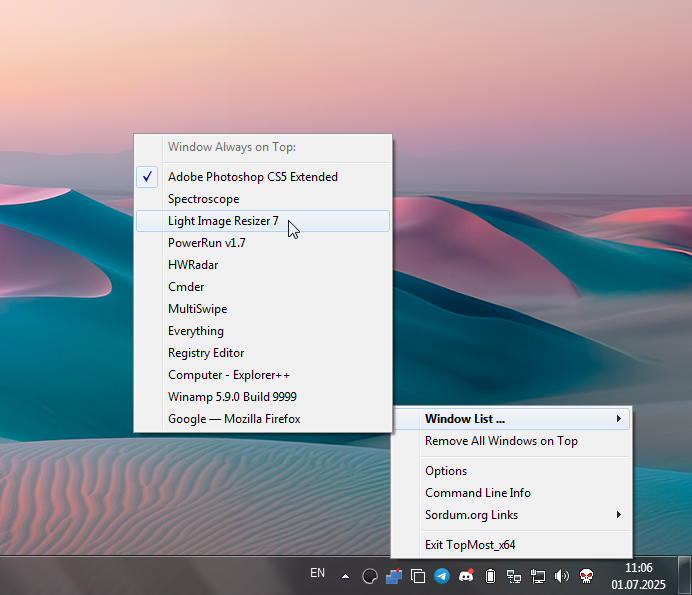
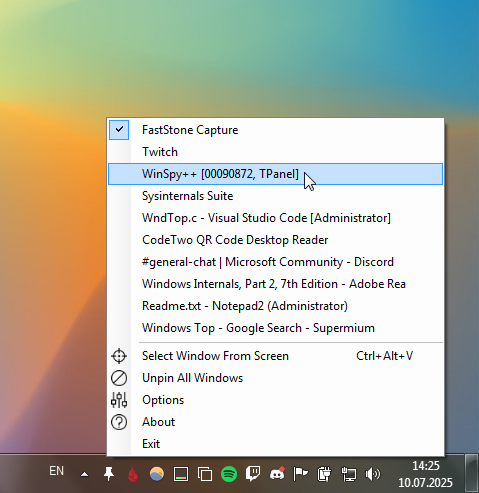
Some Windows Applications doesn’t offer an option to make itself topmost , that is to keep it above all other windows , with Windows Topmost control you can add this feature to any. There are situation that you need this feature, for example when you are monitoring a process window or you are watching a live video feed while doing something else, application doesn’t have a GUI , Once it’s running you can see the Windows TopMost Control icon in your system tray, if you right click it you can see the program Options , under Windows you will find the List of Open windows , To make any Window topmost just click on it – in menu list marked item is topmost.
If you don’t want to use tray menu , you can use the Ctrl + Alt + Space shortcut to lock your currently selected window to the top level of your screen . Now, even if you focus on another window, this application will always stay on top , To unlock it , just select it again and use the same shortcut or you can right click it’s taskbar icon and untick the program name under the windows. To access the options , right click on the software icon on the desktop and select “Options”, you will see the following screen.
You can customize the software according to your needs.Windows TopMost Control supports Command line options, here is the list of Parameters:
-------------------------------------------------------------
Usage: <command> <title or class or hwnd>
Commands:
/S : Set window always on top
/R : Remove window always on top
/D : Remove "always on top" feature from all windows
Examples:
TopMost_x64.exe /S Untitled - Notepad
TopMost_x64.exe /S Notepad
TopMost_x64.exe /S 0x403C4
TopMost_x64.exe /R
TopMost_x64.exe /R Untitled - Notepad
TopMost_x64.exe /R Notepad
TopMost_x64.exe /R 0x403C4
TopMost_x64.exe /D
-------------------------------------------------------------
To make a window always on Top you have 4 Options:
1.Select a Window and double click to Windows TopMost Control icon in system tray
2.Select a Window and use Ctrl + Alt + Space Keyboard shortcuts
3.Use Windows TopMost Control “Windows List” in system tray menu
4.Use a Cmd Parameter
Note: To set programs topmost which running as administrator, Window TopMost Control must run with administrator privilege. With your suggestions We can add it extra features and develop it further.
Supported operating systems: Windows 11, Windows 10, Windows 8.1, Windows 8, Windows 7, Windows Vista, Windows Xp – (x86 & x64)
What is New (Monday, 2 January, 2023)
1.[ ADDED ] – Remove All Windows On Top feature
2.[ ADDED ] – Remove “always on top” feature from all windows (D parameter)
3.[ ADDED ] – Class control for automatic “OnTop” feature
4.[ ADDED ] – High contrast support
5.[ ADDED ] – Some code Improvements
Homepage: https://www.sordum.org/9182/window-topmost-control-v1-3/
Скачать: Window TopMost Control v1.3
WindowSpace v2.6.3
WindowSpace - is a powerful desktop enhancement utility for large monitors, widescreens and multi-monitor systems. Too many open windows make the desktop messy! It affects your productivity as very soon you’ll find yourself hunting for windows, rather than doing the job. This is where WindowSpace can extend a helping hand.
Snap Windows to the Screen Edges & Other Windows
Multitasking has never been easy! Windows overlap each other, hang partway out of sight so that you may even forget that an application is running. WindowSpace makes windows snap to each other and to the screen borders neatly, edge to edge, rather than block or cover one another completely. Snapping is an excellent way to keep your desktop organized.
With WindowSpace, you can align windows at once without having to reposition them constantly on the desktop, or hunt for the application you need behind other windows. When you resize a window, snapping allows you to quickly make two or more windows the same width or height.
Using this feature you can easily line up misplaced windows to clear up more desktop space. It’ll take you less than a second to set any window to its desired position, and make good use of every single pixel of your workspace.
Snap-To-Side – Similar to Aero Snap in Windows 7/8/10
The Snap-To-Side feature lets you expand and maximize windows by dragging them to different edges of the screen. To trigger one of these actions, touch the corresponding edge of the screen with the mouse cursor while moving a window.
To maximize a window vertically, press the default key combination – Alt+F5, or right-click the Maximize title button. Unsnapping window from the screen edge restores its original size. This feature also works for “child” windows which are maximized inside their MDI parent.
Snap-To-Corners – Better than Aero Snap in 7/8/10
The built-in Windows Aero Snap and WindowSpace’s Snap-To-Side features are convenient ways of window management. But WindowSpace goes even further! It improves the original idea by adding some options and makes it more usable for the owners of really big monitors.
You can turn on or off this feature in the Settings on the Moving & Resizing tab. The option is called “Move window to one fourth of the screen when touching the corners (Snap-To-Corners)”.
Move and Resize Windows with the Keyboard
By default, you can resize windows and drag them over the desktop with the mouse. After installing WindowSpace, you’ll be able to do the same by using a set of keyboard shortcuts. This is a great alternative for laptop users and everyone who likes keeping hands on the keyboard.
By pressing Win + Ctrl + Arrow Keys, you can move the active window to the left - right and up - down. To change the width or height of the window, press Win + Alt + Arrow Keys several times until the desired window size is achieved.
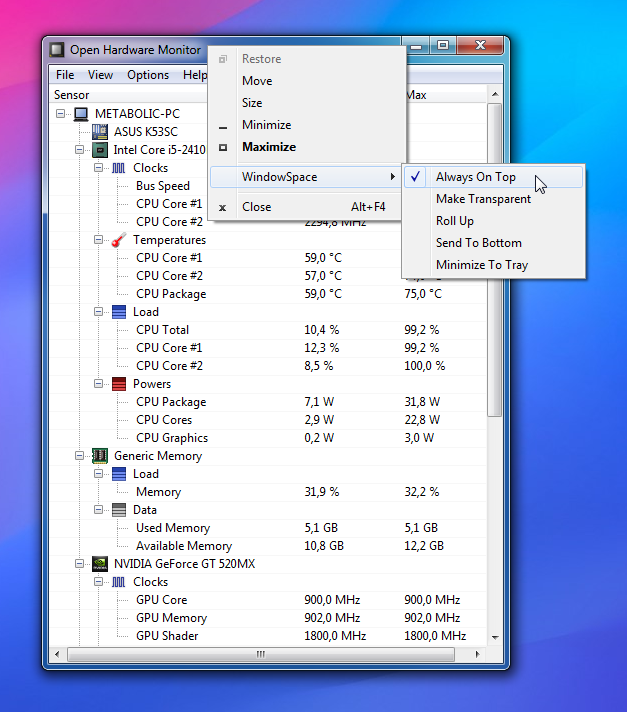
Set Windows “Always On Top”
The “Always On Top” option is a real helper when you multitask in several applications. It lets you pin a window on top of the other window and work with them both simultaneously, without the need to jump from one window to another.
With this option in place, you can, for example, put a web browser on top of the word processing document and conveniently move data between the two applications.
WindowSpace adds the “Always On Top” option to the window menu. This menu appears when you right-click the window title bar or the application taskbar button.
The availability and position of the new options in the window menu can be customized in the WindowSpace Settings dialog.
Minimize to Tray + Hide Window
These two options are clever alternatives to standard Windows minimization. The taskbar is fine for a few windows. But if you open many of them, it becomes cluttered, making it difficult to find a window. With WindowSpace, you’ll get two amazing ways to get rid of this problem. Simply minimize a window to the tray or hide it from view.
Minimization to tray is helpful when you want some applications – Outlook Express, Firefox, Internet Explorer – to run in the background and keep the taskbar free for more important programs you’re working with at the moment.
WindowSpace adds new “Minimize to Tray” and “Hide Window” actions to the standard window buttons. You can quickly minimize a window to the tray or hide it completely from view with a right-click or a middle-click on the Minimize button.
Cascade, Tile and Close All Windows
In just one press of the hotkey, you can tile windows vertically or horizontally, cascade, or close them all. These options work in much the same way as the standard Windows shortcut – Win + D, which minimizes all open windows to the taskbar.
To tile windows vertically, for example, you should press Win + V. The first key press arranges all open windows side by side; the second press on the same hotkey brings windows back to their initial positions. Press Win + Ctrl + Alt + F4 to quickly close all open windows and clean up the desktop workspace for a new task.
Operating System: Windows 10, 8, 7, Vista and XP (32-bit and 64-bit)
Homepage: https://www.ntwind.com/software/windowspace.html
Скачать: WindowSpace v2.6.2
Скачать: WindowSpace v2.6.3
AlwaysOnTop v1.0
Do you sometimes fail to notice Outlook reminder window? Do you wish a chat window would remain always on top of other windows so that you never miss a message? Here's an app for that.
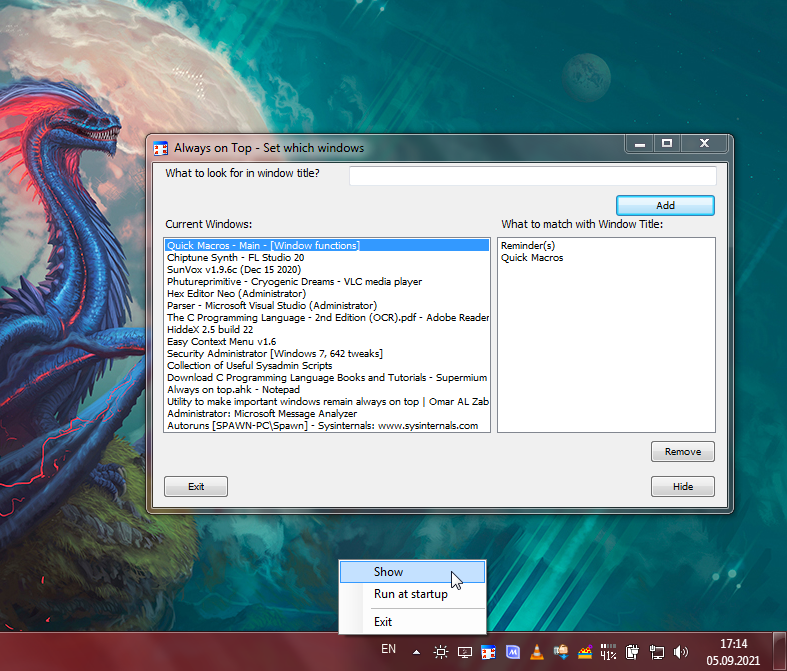
Configure which windows you want always to appear on top and you are done.
This application runs quitely in the background, in the system tray and whenever it notices a new window has come up that you wanted it to appear alwyas on top, it will make it appear always on top.
You can configure which windows you want to appear always on top, by the configuration window.
Homepage: http://omaralzabir.com/utility-to-make-important-windows-remain-always-on-top/
CodeProject: http://www.codeproject.com/Articles/794407/Utility-to-make-important-windows-remain-always-on
GitHub: https://github.com/oazabir/AlwaysOnTop
Скачать: AlwaysOnTop v1.0
PinMe! 2022.09.28
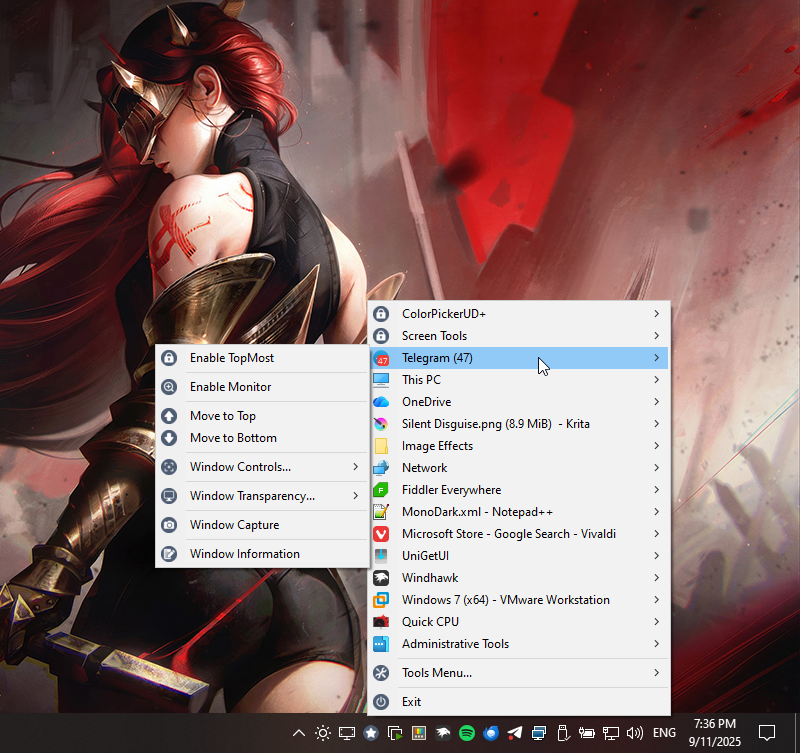
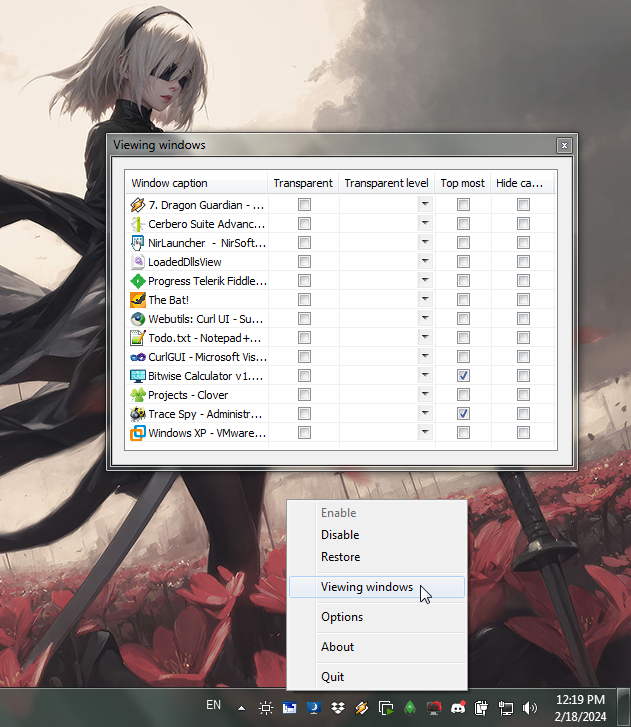
PinMe! allows setting individual windows to TopMost (window always on top) with the following additional features;
• Setting windows to TopMost / NoTopMost
• Changing window transparency levels
• Window captures and region captures
• Desktop captures (foreground and background)
• Basic window statistics
• Window information; dimensions, sizes, styles, etc.
Installation
As of version 0.8.9 PinMe! runs on Windows 10 (Build 14393) and later, including Windows 11.
Extract PinMe! from the archive and copy to a directory from where it can be run.
If you want to have PinMe! run at each startup click on the "Run at Start-Up" option in the menu. A copy of PinMe! will be saved to the
Windows "Startup" folder.
TopMost / NoTopMost
A list of all open and visible windows are shown in Z-Order from the click of the tray icon. Selecting a window positions that window to
TopMost (always on top/pinned) and now the highest in Z-Order. If you select a window that has already been given TopMost it will set it to
NoTopMost (normal).
When more than one window is TopMost, the TopMost windows will take hierarchy in the order which you selected them. The first TopMost window
will go to the bottom and recent to the top. TopMost windows will show up with a locked icon next to them in the menu. Normal windows will
have their default window or system icon.
If a window you want to set to TopMost or NoTopMost is not shown in the menu list of windows you can use customised shortcut keys, found in
Preferences menu, whilst the window is active.
Window Monitor
As of version 0.9.3 PinMe! contains a frequently requested feature to "Monitor" certain windows and automagically set them to TopMost.
When a window is being monitored PinMe! will remember the window(s) and, for example, after a restart set those windows to TopMost again.
One of the caveats with this feature is if you were to monitor a Notepad window all subsequent opened Notepad windows will be set with
TopMost.
Feedback on this feature is warmly welcome.
Window Transparency
There are two ways to change the transparency of a window. The first it to find the window in the menu list and from the, "Window
Transparency", submenu set the desired level of transparency between 10% to 100% viewable.
If the window you want to set the transparency level of is not in the window menu list use the second method. From "Tools Menu..." menu
select, "Enable Window Transparency". Once the setting has been activated you should see the same menu option now listed as, "Disable Window
Transparency". Move the mouse cursor over the window you would like to change the transparency level of and scroll the mouse wheel until the
transparency is at the desired level. Moving the mouse to other windows and scrolling the mouse wheel will change the transparency level of
those windows until you go back to the tools menu to disable the feature.
Whilst this option is activated mouse scroll wheel messages are not passed to the window until this option is disabled, scrolling through a
page in a browser or document for example will not be possible.
Capturing Windows
You can capture the contents of a window in each windows submenu. PinMe! will try to capture the window image even if it is located behind
other windows. If it is unable to do so PinMe! will attempt to bring that window to the front before capturing.
Images can be saved in either .PNG, .JPG and .BMP., the image is also copied to the clipboard if you have the option enabled in Preferences.
Capturing Screens & Desktops
You can capture whole screens, desktop foreground and background. By going to, "Tools Menu...", you will find a submenu titled, "Capture
Display Devices...". The submenu will contain a list of all the display devices currently connected and active including two options titled,
"Capture Desktop Background", and, "Capture Desktop Foreground". To capture a screenshot simply select the appropriate display device and a
save dialogue will appear to allow you to save the captured image to a folder.
The following options capture the entire desktop across all monitors/displays:
• Capture Desktop Background,
◦ captures all of the desktop background across all display devices without any of the windows on top.
• Capture Desktop Foreground,
◦ captures all windows on top of the desktop across all display devices.
Images can be saved in either .PNG, .JPG and .BMP., the image is also copied to the clipboard if you have the option enabled in Preferences.
Region Captures
Region capture can be activated by selecting, "Tools Menu...", then, "Enable Region Capture". Once you are in region capture the display
will turn a slightly different colour and the mouse cursor will change to a cross hair with a square magnified window next to it.
There are two methods for selecting the capture points. The first is to click and hold down the mouse pointer at the start position and drag
the mouse pointer to draw a rectangle over the area of screen you would like to capture. You will notice a coloured rectangular box will be
created, this is the region that will be captured. The second method is to left mouse click at the first capture point then left mouse click
at the second capture point. You will notice the cross hair will stay active at the first location, this helps you correctly size the
corners of the rectangle you wish to capture.
To help you capture the correct region a magnify window is available. Inside the magnify window information will display the x and y
coordinates of the cross hair position. A colour picker in the top right hand corner is displayed. The top left hand side shows the zoom
factor which, you can change by scrolling the mouse wheel to zoom in and out of the image.
After selecting a capture region the save dialogue automatically appears. Images can be saved in either .PNG, .JPG and .BMP., the image is
also copied to the clipboard if you have the option enabled in Preferences.
Exiting from region capture can be done by pressing the right mouse button.
Depressing the wheel mouse button at any time during a capture will cause the mouse to move at slow speed. This may help in correctly
aligning the capture cross hairs.
Pressing the "SHIFT" key after the first cross hair has been set will delete it.
Power Management
There are three settings in the power management menu, these are to prevent the monitor or system from sleeping;
1) Prevent Display Sleeping
2) Prevent System Sleeping
3) Enable Away Mode
Window List
Window List displays all the windows on the current desktop including child windows in tree like hierarchy. There are options to filter for
certain types of windows; Top-Level, Immersive, Store Apps, Children, Threads. Each entry is listed using its window handle and classname.
Double clicking on a window allows you to open the Window Information window to view its details.
Window Information
Provides information on the window details including dimensions and certain capabilities. For Store Apps there is a separate tab detailing
basic package information.
There is a menu option here that allows you to point at a window using the mouse cursor to view its details.
Window Controls
Under each windows menu there are options to send messages to the window to; Close Gracefully, Close Forcibly, Restore, Zero, Maximise, Minimise.
Run As Administrator
Introduced in Windows Vista and used with subsequent editions, the Windows OS comes with a security feature called User Account Control - or
UAC for short. UAC prevents programs and applications running with elevated (Administrator) privileges to help protect the operating system
from being compromised by malicious software. By default PinMe! does not request elevated privileges. Because of this PinMe! may not by able
to send messages to communicate a change of window state to a program that is running with higher privileges than PinMe!. This is due to
another security technology called User Interface Privilege Isolation (UIPI).
If you find that PinMe! is not changing the state of a particular window you can request PinMe! to run in Administrator mode by going to,
"Tools Menu...", menu and selecting, "Run As Administrator", which will let PinMe! run with high integrity. Once activated Windows will
prompt you with a User Account Control dialogue asking if you want to allow PinMe! to make changes to the computer. Click yes if you do.
Once PinMe! is running with high integrity in Administrator mode PinMe! will be able to send messages and communicate with those windows.
What's New in Version 2022.09.28
Released September 28, 2022
+ Fixed: Magnify & captures using incorrect coordinates on certain display arrangements
+ Fixed: PinMe! tray icon not being recreated on custom start/ taskbar replacement tools
+ Fixed: Window Information displaying incorrect Windows 11 pre-release feature values
Author: Teddy Rogers
Email: teddyrogers©tuts4you.com
Source: https://tuts4you.com/download.php?view.3551
Source: https://forum.tuts4you.com/topic/36940-pinme/
Source: https://forum.tuts4you.com/files/file/2125-pinme/
Скачать: PinMe! 2022.09.28
|